
Uilleann Pipes Resources
Please find the following resources below, each followed by downloadable documents:
Basic Uilleann Pipes Maintenance
Generally, avoid extended exposure to extreme temperatures and humidity. In the case of low humidity, it is helpful to have Johnson and Johnson waxed dental floss to add to the necessary joints. When humidity is high, it may be necessary to take some floss off of the joints to avoid cracking. Note that extreme altitudes will also have an effect on the pipes, specifically the reed.
When it comes to the reed, high humidity can cause the reed to open, making it flatter and require more air pressure to sound. In these instances, it may be helpful to squeeze the bridle with the thumb and forefinger to close the lips a bit. In desperate emergencies, one can take a needle nose pliers to the bridle. This runs a very high risk (depending on experience) of cracking and ruining the reed beyond repair. In low humidity, the reed may close down a bit, making it sharp and will require less pressure to sound. The thumb and forefinger can be used to squeeze the reed and bridle from the sides to open the lips. Extreme cases may require the pliers, with the same risks as noted. The serious and/or professional player will find that eventually being able to make reeds is a must, as the unpredictability of the instrument can leave you in a mighty pickle.
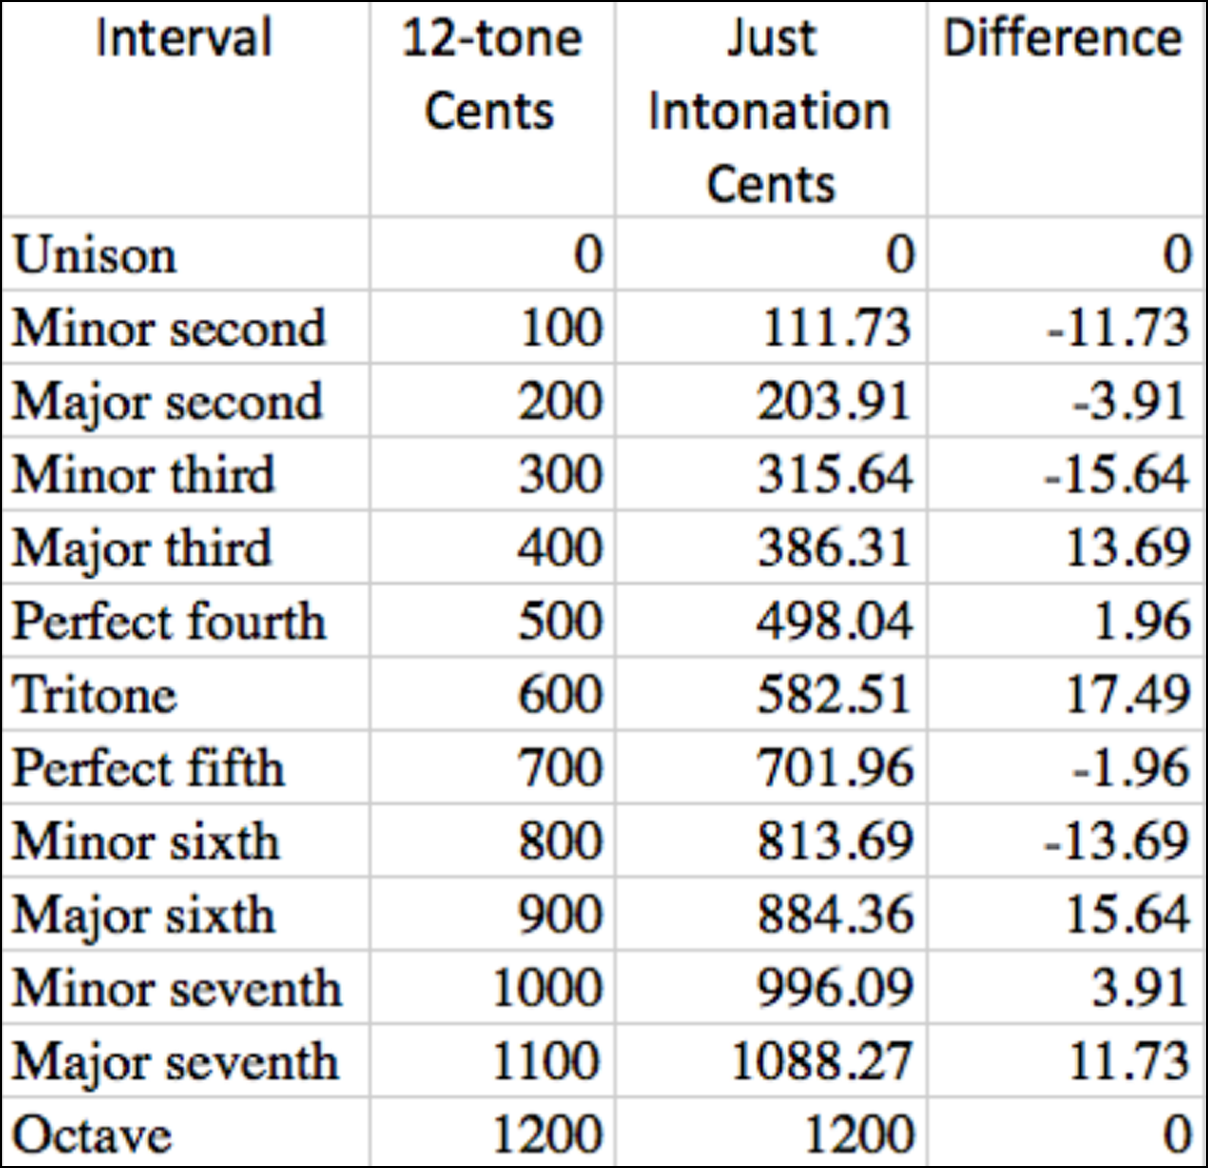
When playing the pipes after an idle period, it is helpful to notice the tuning with a tuner right away. This is so the reed is maintained and bad habits regarding intonation are not developed. It is well to remember that the pipes are tuned to the “Just Intonation” scale rather than the “Equal Temperament” scale. When using an electronic tuner (which are normally geared to the equal scale) the notes, when in tune for the key of D, will read as follows (in cents):
E = +3.9
F# = -13.7
G = -1.95
A = +1.95
B = -15.64
C = -3.89
C# = -11.73
D = 0
If the overall pitch of the chanter is sharp, floss may be wrapped around the bottom of the reed to allow the reed to sit higher in the reed seat and vice versa. When this is done, keep in mind that the upper notes (D C B A) are affected more than the bottom notes. Also keep in mind that some notes require different pressure to get in tune. For extreme cases, placing electrical tape over the upper part of a tone hole will flatten that note. It is typical to use blu tac, rolled paper, or other short rush to tune the bottom D. This allows for flexibility in different climates. Enjoy!
Download this information here:
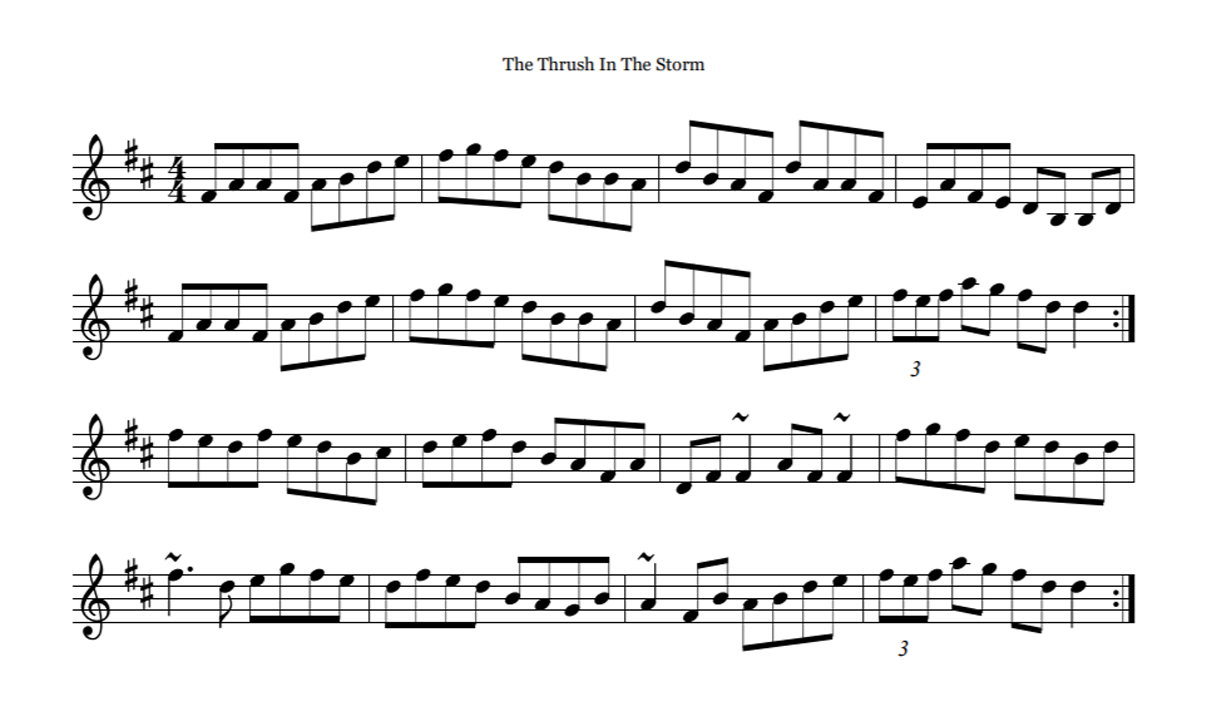
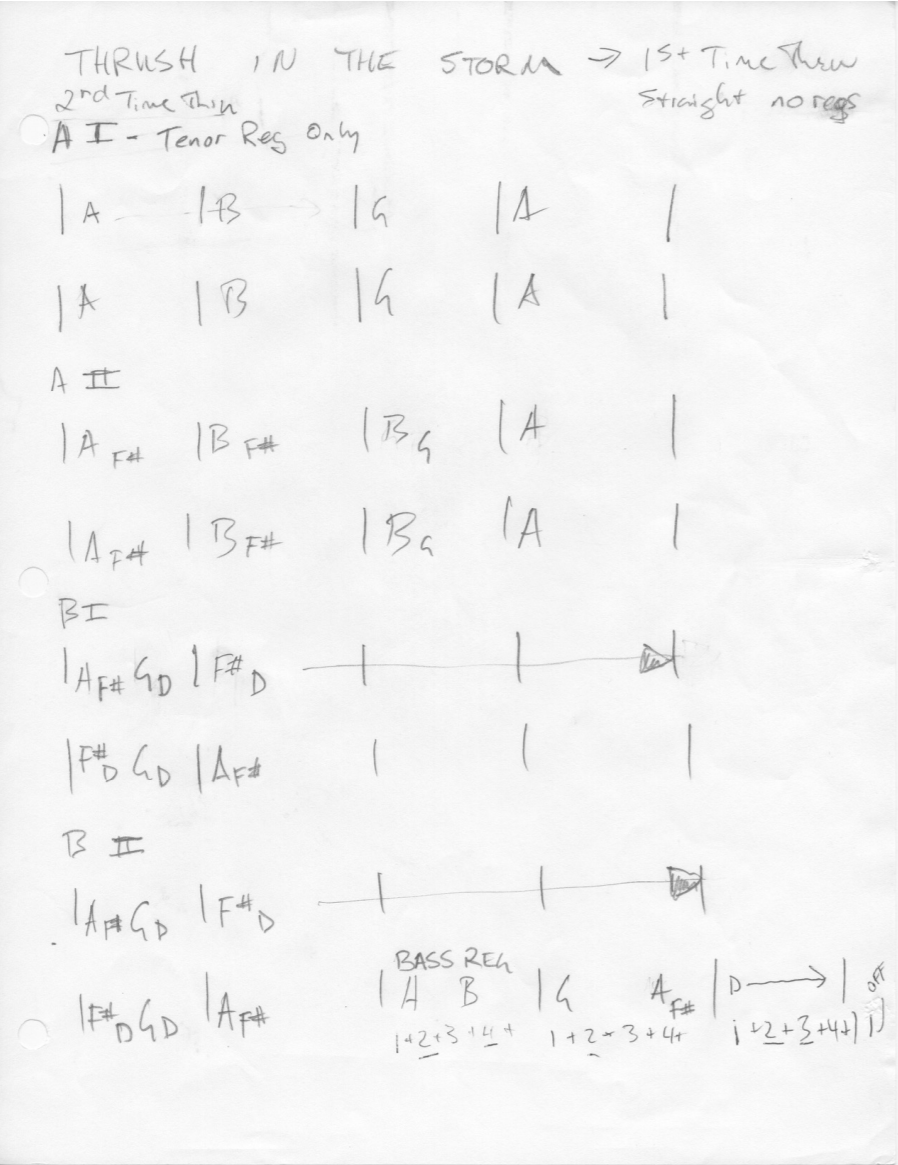
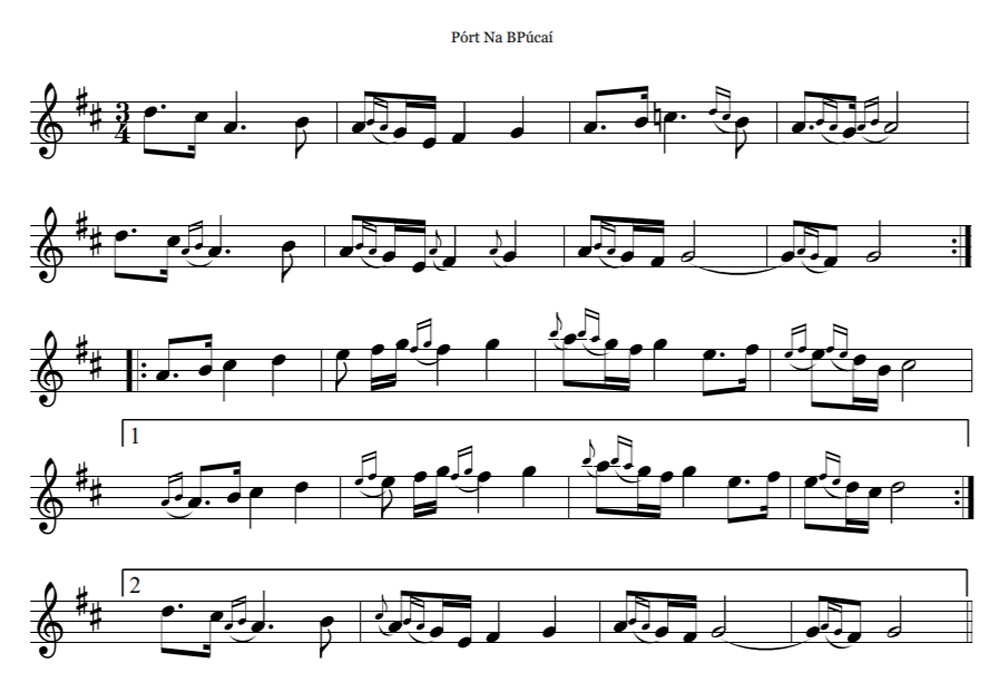
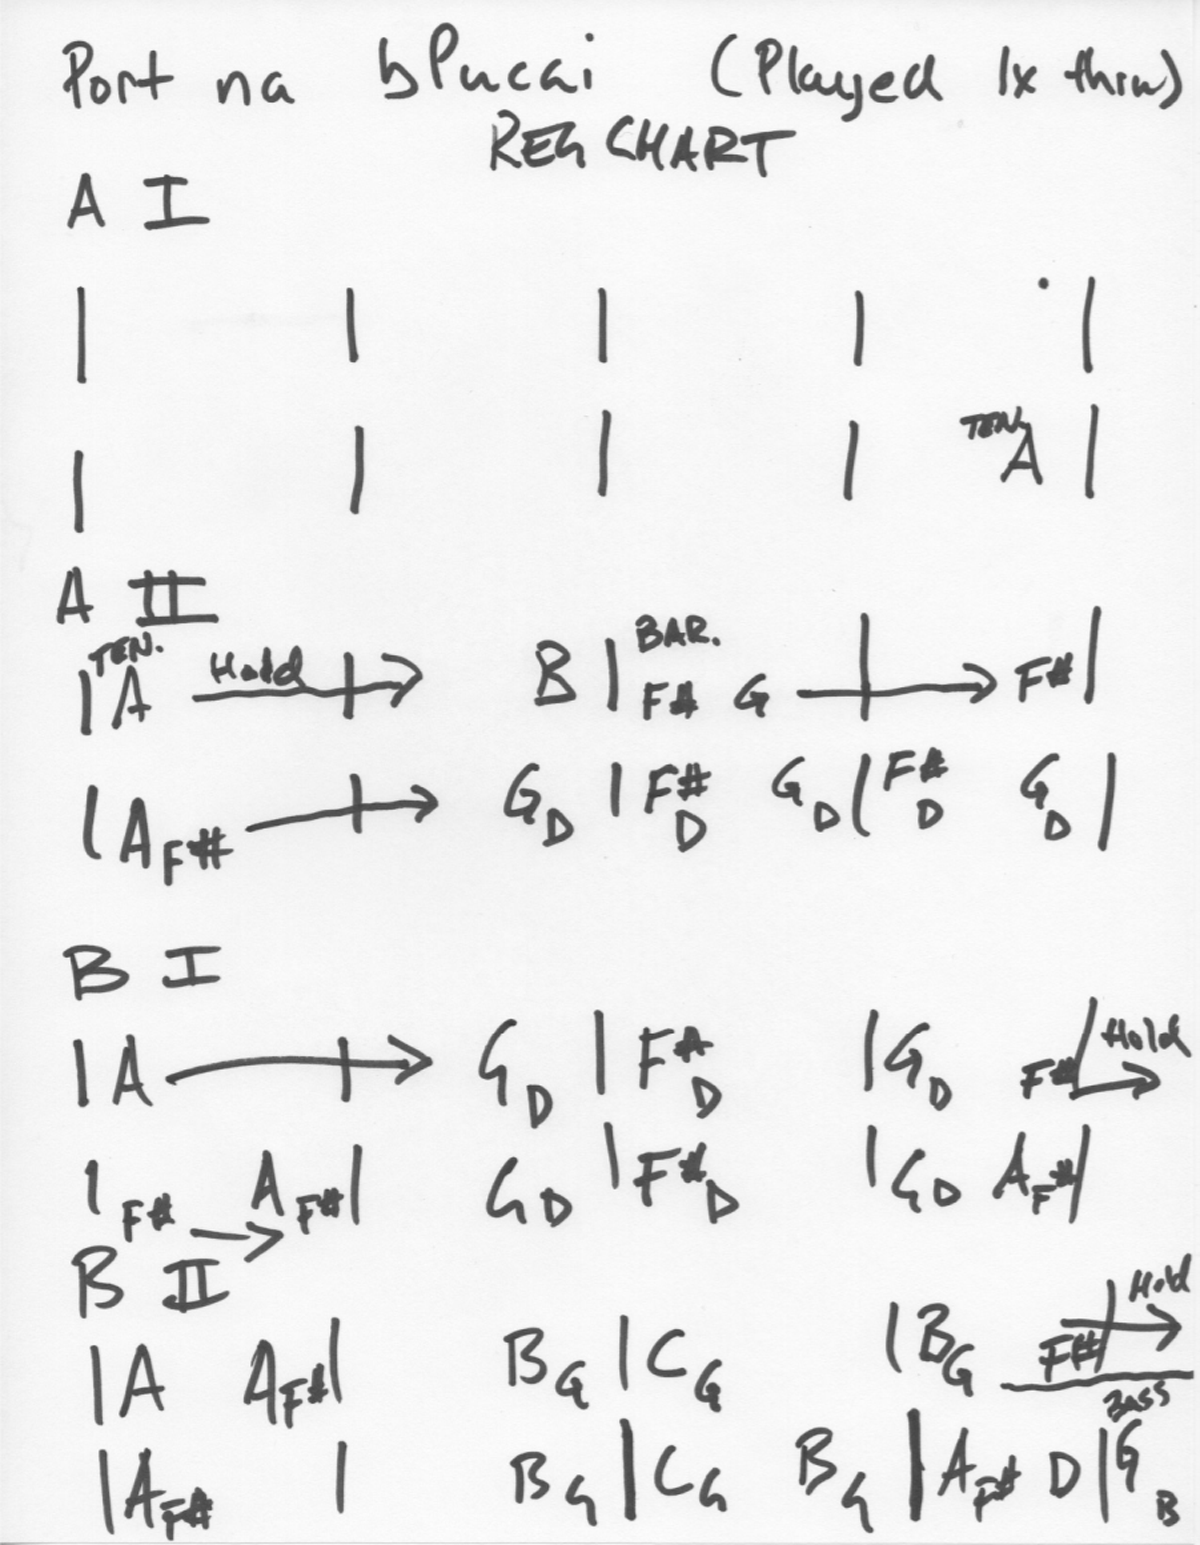
Dancing with your Regulators & Honing a Performance Piece
“We are what we repeatedly do. Excellence, then, is not an act, but a habit.” - Aristotle
I. Have a good plan for the tune that you are applying regulator accompaniment and/or performing
a. Pick a good version of the melody to stick to so that improvisation can emerge (rather than the other way around - see Aristotle)
b. Know the key and chord structure of the tune to build your plan around
c. Juxtapose Alternative Contexts
i. Relative Minor/Major Chords
ii. Variations on the melody
iii. Variations on the accompaniment
iv. Dynamic shifts (our only option with dynamics is turning on and off drones and octave changes in melody or regulator accompaniment)
II. Understand the context in which you will be playing
a. Solo – most freedom
b. Ensemble with other adjustable tuning instruments (e.g. fiddle, flute) – less freedom
c. Ensemble with other fixed tuning instruments (e.g. accordion, piano) – least freedom
III. Regulators for a slow air
a. Tuning is the order of the day (see Uilleann Piping Fundamentals)
b. Chord structure of the melody is the focus, rather than the rhythm
c. Keep your audience on the edge of their seat
IV. Regulators for a dance tune
a. Maintaining the rhythm is the order of the day
b. Chord structure (i.e. your plan) is an important secondary focus
c. Subdividing the rhythm on paper helps with the rhythmic regulator playing
Download this information here:
CLICK ON ANY OF THE IMAGES BELOW FOR ENLARGEMENT:
Uilleann Pipes Beginner Objectives
- Posture and placement of the bellows and bag, allowing for the chanter to in a relatively ergonomic position.
- Proper grip of the chanter which means keeping the fingers straight while finding the correct joint on the finger with which to cover the tone hole and maintaining tone hole coverage to develop a seal.
- Awareness of the basic functionality of the instrument i.e., making sure that there are no leaks regularly, and making sure that there have been no major changes to the functionality of the reed.
- Each time one sits down to play, it is helpful to notice the tuning of the chanter, so as to maintain the playability of the chanter reed and to avoid bad habits. This will also serve to develop a good ear.
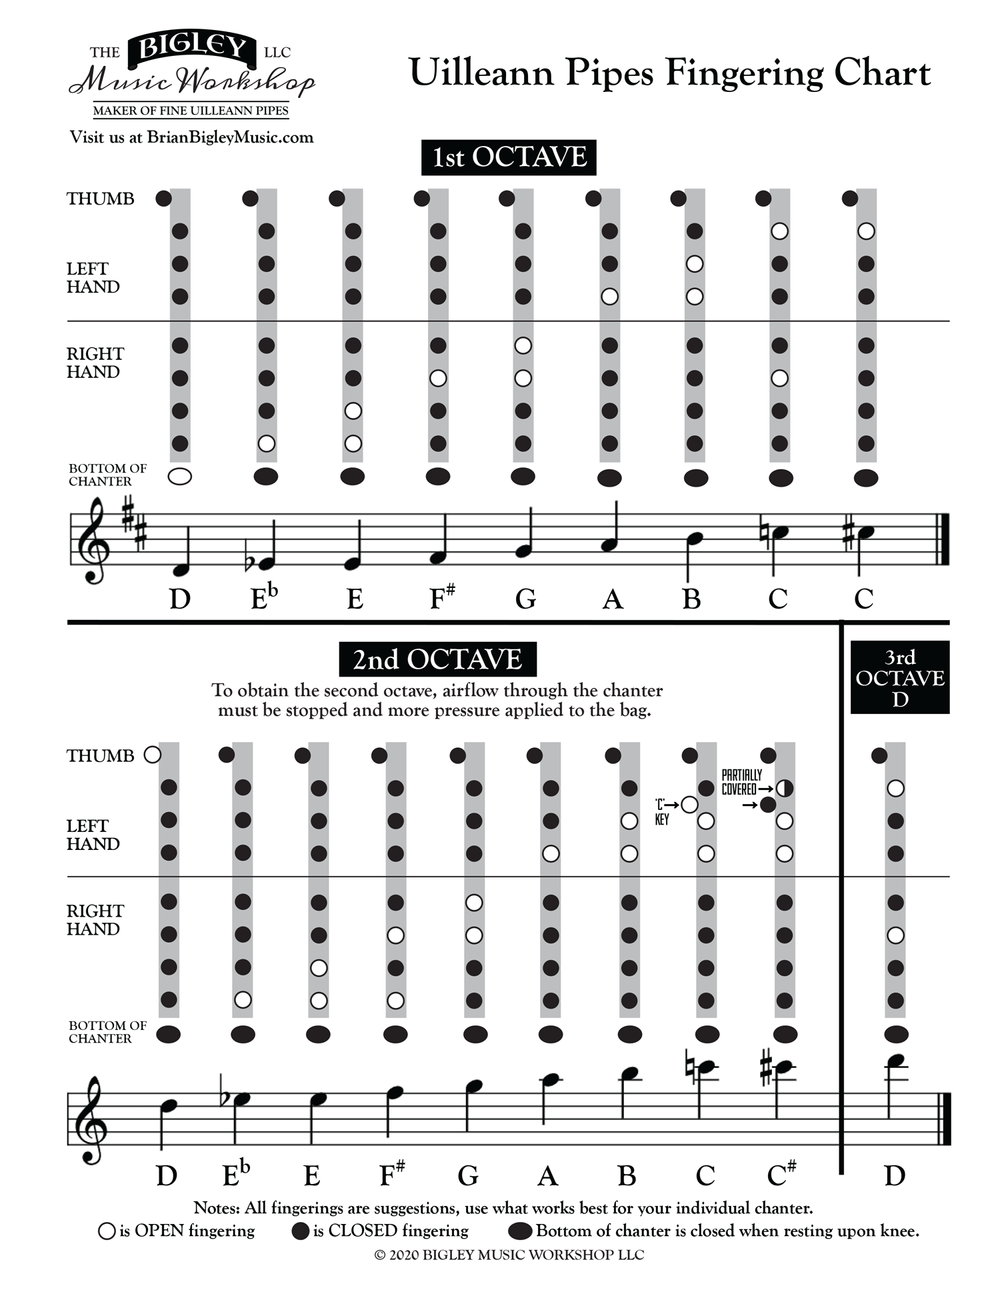
- Once the above is established, playing a ‘D’ Major Scale starting with the ‘Back D’ and going down to a ‘Bottom D’ is a great way to get a feel for what it takes to seal the tone holes as it will be easy to tell if there are any leaks as you go down the scale.
- A ‘D’ Major Scale going up the scale from the bottom up to the back ‘D.’
- A tune such as ‘Dawning of the Day’ may be attempted at this point.
Download this information here:
Uilleann Piping Fundamentals
I. Important features and maintenance of your set
A. Air tightness
1. Keys
2. Joints
3. Leather
4. Fingers
5. Reeds properly mounted in reed seat
B. Working, Noiseless Flapper Valves – yes, it is possible
1. Bellows
2. Bag
3. Mark on the outside to indicate where the valve is attached to the pipe
C. Little Conveniences
1. Hip and/or elbow pads. Comfort is king!
2. Ring around the arm belt to keep buckle engaged
3. Belts that are not too long or short
4. One regularly used connection from bag to bellows
5. Minimal assembly, if possible
6. A case conducive to easy extrusion, assembly
7. A case that fits your pipes
II. Tuning Process
A. Every time you play, check the tuning to a tuner
1. Know the difference between the just and equal scales
2. Know the individually justified note’s deviation relative to the equal scale (see Maintenance Guide and Equal Vs. Just chart - elsewhere on this page)
B. Be hyper aware of the amount of pressure being used to achieve an in-tune note on the chanter, drones, and regulators
C. Chanter - make the chanter pressure as consistent through the two octaves as possible
1. Some notes go up in pitch with increased pressure
2. Some notes go down in pitch with increased pressure
3. Some notes go up in pitch with decreased pressure
4. Some notes go down in pitch with decreased pressure
5. Some notes will need alternative fingerings
- From day to day
- Between octaves
- Depending on pressure
- Depending on what other instruments you are playing with
- Depending on the type of tune being played, you might let a note slide if it is pretty close (Reel – not a big deal for a passing note versus a Slow Air – long note tuning is paramount)
6. More often than not, the ‘E’ note in the second octave will take the most pressure to get into tune
D. Drones - make sure the drone reeds are robust enough to stay in tune with the fluctuations in pressure required for the chanter
1. Start with the tenor drone and do a scale (both octaves) with the chanter
2. Add the Baritone and do the scale as above
3. Add the Bass and do the scale as above
4. Note the effect of the ‘phase locking’ phenomenon
- Under certain conditions of the drone reeds sharing a chamber, they will lock as a result of sharing the air pressure
- The effect is that if you tune one drone, the tone of the other two will go with it, to a certain point where they fall out of phase
E. Regulators - make sure the regulator reeds are robust enough to stay in tune with the fluctuations in pressure required for the chanter (and drones)
1. After getting your regs close to being in tune throughout the range of the regulator, take one note at a time on the reg and play a two octave scale on the chanter, slowly making sure that the note (on the regulator) doesn’t waiver under the fluctuations in pressure. When done successfully, add the drones to make sure all are working together.
2. Note the slightly different pressures that are required to make all of the notes come into tune, making sure not to stray too far from the standard of the tuner
III. Playing Fundamentals
A. Listening, the piper’s eleventh finger
1. By careful listening, you absorb the aesthetic
B. Know your scales and arpeggios
1. This will give you 20% of all tunes, right under your fingers
C. Learn how to count and subdivide rhythms
1. |1 e + a| 2 e + a |3 e + a| 4 e + a|
D. When learning a tune or a scale, play slowly with a metronome and tuner in front of you
1. Gradually speed up the metronome
2. Find your zone of proximal development to track progress
E. Forget all of the above and just enjoy yourself playing
Download this information here:
